Two Clocks Are Running on Your Battery Right Now
Most people think about battery lifespan in terms of how many times they have charged it. That is understandable. Battery manufacturers quote cycle life numbers and the conversation tends to stop there. But there are actually two separate clocks running on your battery at the same time, and only managing one of them while ignoring the other is one of the most common reasons batteries fail earlier than they should.
The first clock is cycle life. Every time your battery goes through a charge and discharge, it completes one cycle. Over thousands of cycles, the internal chemistry gradually changes. The SEI layer thickens. The anode structure experiences mechanical stress. Active lithium becomes trapped in the electrodes and cannot be recovered. Each of these changes is tiny on its own but they accumulate with every cycle until the battery can no longer hold as much energy as it could when it was new. Manufacturers define end of life as the point where usable capacity has dropped to 80% of the original rating.
The second clock is calendar life. This one runs whether you use the battery or not. The electrolyte slowly decomposes. Chemical reactions continue at a low level even during storage. A battery sitting fully charged in a hot room is aging meaningfully even if nothing is connected to it. Calendar aging is slower than cycle aging in most cases but it is always happening in the background and it compounds with cycle aging rather than running separately from it.
In a Nigerian off-grid solar system, both clocks are running hard simultaneously. The battery cycles every single day, sometimes more than once if the system is small relative to the load. And the ambient temperature in the battery room during the dry season can sit well above 35°C for months at a time, which accelerates calendar aging significantly. The combination of daily cycling and sustained heat is exactly what pushes batteries into early failure in this climate.
Understanding that both clocks exist changes how you approach battery management. It means that even on days when you are not cycling the battery heavily, the temperature in the room still matters. It means that a battery that has been sitting unused for six months has still aged, and you need to account for that. And it means that the strategies for extending lifespan have to address both mechanisms, not just one.
The good news is that most of the practical steps on How to increase lithium battery lifespan that will reduce cycle aging also reduce calendar aging. Keeping the battery in the middle state of charge range, controlling temperature, and avoiding the extremes all slow down both clocks at the same time. The rest of this post walks through each of those steps in the order of how much impact they have.
This post is part of the Eneronix lithium battery cluster. For the complete foundation on how lithium batteries work including charging stages, voltage, and what drives degradation at the chemistry level, start with the pillar: Lithium Battery Basics: Lifespan, Voltage, Charging & Real-World Performance Explained
How to Increase Lithium Battery Lifespan: 6 Proven Methods
1. Control the Depth of Discharge
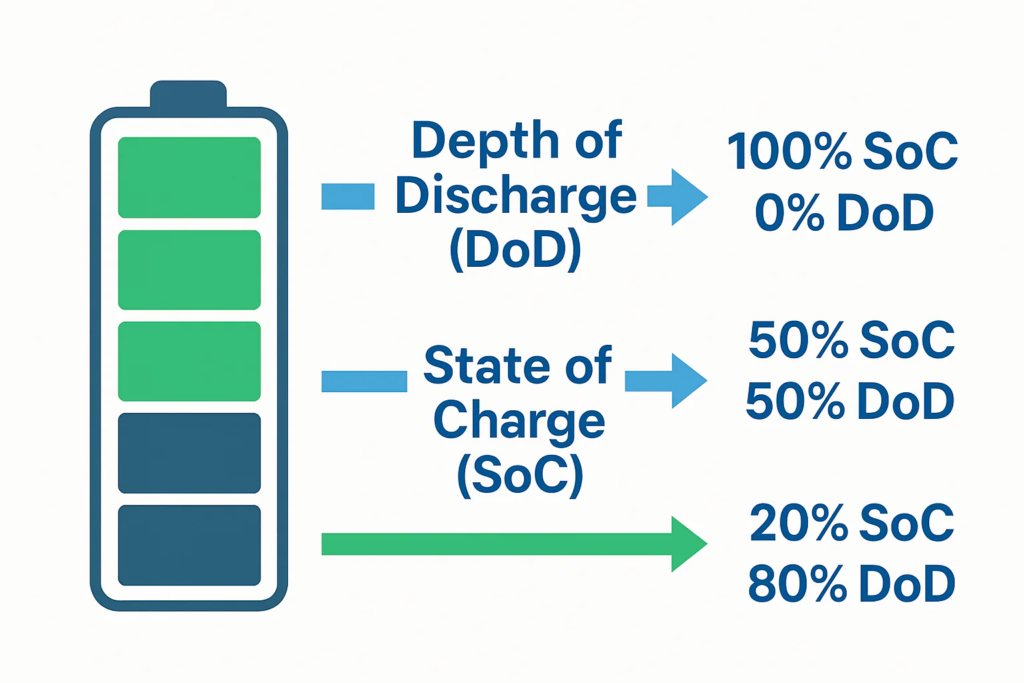
If you could only change one thing about how you manage your lithium battery, this would be it.
Depth of discharge is the percentage of the battery’s total capacity that you use before recharging. A battery that goes from 100% to 20% has been discharged to 80% depth of discharge. A battery that only goes from 90% to 40% before recharging has been discharged to 50% depth of discharge. The difference between those two patterns, repeated every day for years, is enormous.
A quality LiFePO4 battery consistently cycled at 80% depth of discharge will typically deliver 3,000 to 5,000 cycles before dropping to 80% of its original capacity. The same battery cycled at 50% depth of discharge can deliver well above 6,000 cycles under the same conditions. That is not a small improvement. At one cycle per day, the difference between 3,000 cycles and 6,000 cycles is the difference between a battery that needs replacing in 8 years and one that is still performing at 10 or 12 years.
The reason shallow cycling extends lifespan so dramatically comes down to the chemistry we discussed in the previous section. Every cycle causes a small amount of SEI layer growth, anode stress, and lithium trapping. The deeper the discharge, the more severe each of those effects per cycle. The bottom 20% of the discharge range is chemically the most stressful zone. Cells that regularly go into that territory age noticeably faster than cells that are kept in the middle range. Avoiding the deep end of the cycle is not just good practice. It is the single most effective thing you can do.
The practical challenge is that most people do not consciously control their depth of discharge. They run the system until the battery is low and charge it when solar is available. The depth of each cycle depends on the load, the solar harvest that day, and the size of the battery bank. You cannot change the weather or your energy needs. But you can change the size of the battery bank, and that is where the engineering solution comes in.
If your battery bank is sized so that your typical daily energy use only draws down 40 to 50% of the total capacity, your daily depth of discharge is automatically shallow. You do not have to think about it or manage it manually. The system just cycles in a comfortable range every day because the bank is large enough relative to the load. This is why battery bank sizing is not just about having enough capacity for tonight. It is about engineering the daily cycling pattern so the battery naturally stays in the range where it ages most slowly.
A bank that is twice as large as your minimum daily requirement will run at roughly half the daily depth of discharge compared to a bank sized to exactly your minimum need. Over 10 years, that difference in daily stress accumulates into a dramatically longer service life from the same battery cells.
To work out exactly how much capacity you need based on your daily load, autonomy requirements, and the depth of discharge that will give you the cycle life you want, the LiFePO4 Battery Bank Calculator on the Eneronix resources page does this calculation properly. It accounts for usable capacity at your target depth of discharge, not just nameplate figures, and shows you runtime scenarios at different load levels so you can see exactly what you are buying in practical terms.
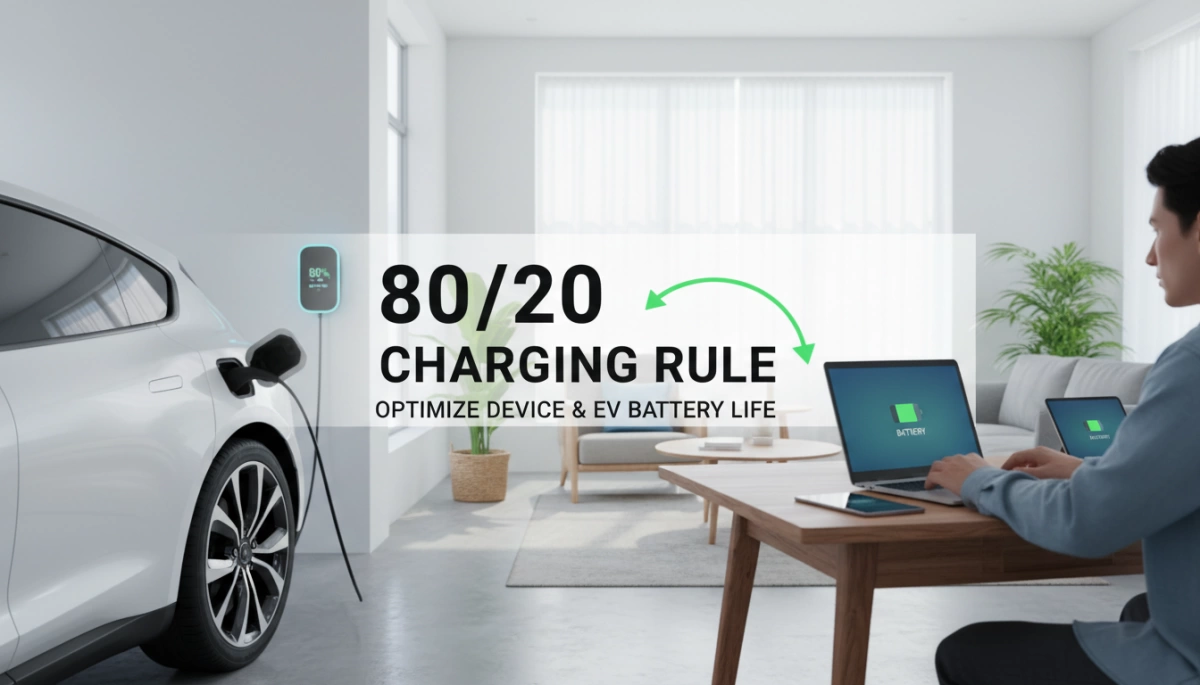
2. Keep the Battery in the Middle The 20 to 80 Rule
Depth of discharge tells you how far down you go. This section is about where you operate within the full range and why both ends of the scale cause damage even if you never go to the absolute extremes.
The practical operating range for daily use on a LiFePO4 battery is 20% at the bottom and 80% at the top. Some people use 90% as the upper limit for even more power usage. Either way, the principle is the same. You are deliberately leaving a buffer at both ends of the battery’s range rather than using the full 0 to 100% every cycle.
The reason the top buffer matters is something that surprises most people. Charging a LiFePO4 battery to 100% every day is not neutral. It puts the cells in their highest voltage state, which is where electrolyte oxidation accelerates. The cathode material experiences more stress at full charge than it does at 80% or 90%. And when the battery sits at 100% for extended periods, especially in a warm room, the rate of calendar aging increases noticeably compared to a battery that is kept at a partial state of charge.
The reason the bottom buffer matters is equally well documented. The bottom 20% of the discharge range is where the anode structure comes under mechanical stress, where lithium plating risk increases, and where internal resistance rises sharply. Every cycle that goes below 20% causes more damage per cycle than a cycle that stays above it. This is why the BMS cutoff is set at around 20% on most well-configured systems rather than at absolute zero.
So, the 20 to 80 rule is not a vague guideline. It is a way of keeping your cells out of both the top stress zone and the bottom stress zone during daily operation. The cells in the middle range are more chemically stable, generate less heat per cycle, and age more slowly. Staying there consistently is one of the most effective lifespan extension strategies available.
The good news is that you do not need to monitor this manually every day. Your inverter has settings for both the charge cutoff voltage and the discharge cutoff voltage, and you can set them to enforce the 20 to 80 range automatically.
For a 48V LiFePO4 system, setting your absorption or bulk charge voltage to approximately 55.2V rather than the maximum 58.4V will stop the battery around 80% instead of 100%. Setting your low battery cutoff to around 49.6V rather than 44.8V keeps the system from going below 20%. Every inverter has these settings, though the menu names vary between brands. Check your inverter manual for the charge voltage limit and the battery low voltage cutoff.
One important thing to note. While you should target 90% for daily charging, you should let the battery reach 100% occasionally. Once a week or once every two weeks is enough. The reason is cell balancing. Most LiFePO4 batteries use passive balancing, which only activates at the top of the charge cycle when cells are near full. If the battery never reaches 100%, the BMS never gets the opportunity to balance the cells, and imbalance accumulates silently over months. The occasional full charge is the reset button that keeps the cells aligned.
For a detailed explanation of exactly how the 20 to 80 charging windows work and the chemistry behind why both limits matter, the What Is the 80/20 Rule for Lithium Batteries post covers this in full with practical inverter configuration guidance.
3. Maintain The Correct Temperature

If depth of discharge is the single biggest lever you can pull on cycle life, temperature is the single biggest lever on calendar life. And in Nigeria, it is the one that most installations get completely wrong.
The comfortable operating zone for a LiFePO4 battery is 15°C to 35°C. Inside that range the chemistry behaves as the manufacturer designed it to. SEI layer growth is gradual. Cycle aging follows the rated cycle life curve. Calendar aging is slow enough that a well-managed battery genuinely reaches 10 to 12 years of service before meaningful capacity loss.
High operating temperatures significantly accelerate lithium battery degradation, as demonstrated in NREL research.
Above 35°C, every one of those processes accelerates. Research consistently shows that operating a lithium battery above 45°C roughly doubles the rate of capacity degradation compared to operation at 25°C. That is not a 10 or 15 percent increase in aging speed. It is a doubling. A battery rated for 10 years of service life at 25°C may deliver only 5 to 6 years if it consistently runs at 45°C. The heat does not cause sudden failure. It causes the battery to age at twice the speed without giving you any obvious warning that it is happening.
In a typical Nigerian installation, the gap between the rated operating temperature and the actual battery room temperature is often larger than people realise. A closed equipment room in Port Harcourt, Lagos, or Abuja during the harmattan or dry season can reach 38 to 42°C ambient by midafternoon. The battery itself generates heat during charge and discharge from its internal resistance, adding another 5 to 10°C inside the enclosure on top of the ambient room temperature. A battery in a room that reads 40°C on a thermometer may be experiencing 48 to 50°C at the cell level during an afternoon charge from the solar panels.
At 50°C, most LiFePO4 BMS units enforce a high temperature charge cutoff. Charging stops. Your panels are producing but the battery refuses to accept charge because the cells are too hot. This is the protection working exactly as designed, but it means your system is not using available solar energy and the battery is sitting hot and charged, which is precisely the combination that accelerates calendar aging the fastest.
The cold end of the temperature range matters less in most Nigerian locations but is worth understanding. Below 0°C, charging causes lithium plating on the anode, which is irreversible damage. In highland areas or during unusually cold harmattan nights, if the battery temperature drops significantly and the solar panels start pushing charge current at first light, there is a real risk of cold-temperature charging damage if the BMS does not have an adequate low temperature charge cutoff.
Practical thermal management does not require air conditioning. The most effective interventions are simpler than that.
The battery room should have forced ventilation that activates when the temperature rises above 32°C. A wall-mounted exhaust fan on a thermostat draws in cooler outside air and prevents the room from building up heat during the day. This single intervention can reduce peak enclosure temperature by 5 to 8°C in most installations, which is often enough to keep the battery below the 45°C degradation acceleration threshold.
The battery should never be installed against a west-facing external wall. West-facing walls receive direct afternoon sun and can be 10 to 15°C hotter than the room ambient during peak sun hours. Never install in a roof space. Roof spaces in tropical climates can reach 60 to 70°C, which will destroy a battery within months. And never install in a completely sealed room with no ventilation at all, which is unfortunately common in many Nigerian installations where security concerns lead to rooms being sealed tightly.
For a full technical breakdown of exactly how temperature interacts with BMS charge and discharge limits and why hot batteries cause the BMS and inverter to conflict in ways that compound the problem, Temperature Effects on Battery Communication and Control in Solar Systems is the detailed reference.
4. Maintain Correct Charge Rate, Full Charges, and the Balancing Window
Depth of discharge and temperature get most of the attention in battery lifespan discussions, and rightly so. But charge rate is a third factor that quietly affects longevity in ways that are easy to overlook, particularly in solar systems where the charge rate is not always consciously set by the installer.
Charge rate is expressed as a C-rate, which is the charging current relative to the battery’s capacity. A 1C rate on a 200Ah battery means charging at 200A. A 0.5C rate means charging at 100A. A 0.2C rate means charging at 40A.
LiFePO4 batteries can technically accept charge at 1C or even higher without immediate damage. The BMS will allow it as long as the temperature stays within safe limits. But consistently charging at high C-rates generates more heat inside the cells during each charge cycle than lower rate charging does. That additional heat stresses the SEI layer and accelerates the same degradation mechanisms that high ambient temperature causes. It is not a dramatic effect on any single cycle but over thousands of cycles it adds up.
For daily solar use, a charge rate between 0.2C and 0.5C is considered the sweet spot for longevity. This means for a 200Ah battery bank you are looking at charge currents between 40A and 100A as the ideal daily range. Most properly sized MPPT charge controllers operating with an appropriately sized solar array will naturally fall within this range under normal conditions. Problems arise when the solar array is significantly oversized relative to the battery, or when a generator is used to fast-charge the battery at a high rate regularly.
The practical setting to check is the charge current limit on your MPPT controller and on your inverter’s built-in charger if it has one. Many installers leave these at their factory maximums. Reducing the maximum charge current to 0.5C of your battery capacity costs you nothing in terms of daily energy harvested because the battery will still reach full charge before the end of the solar day in most cases. What you gain is reduced internal heat generation on every single charge cycle for the life of the system.
Now here is where it gets slightly counterintuitive. Even though you should limit daily charging to the 20 to 90% range as discussed in Section 3, you should periodically allow a full charge all the way to 100%. And when you do that full charge, you should allow the charger to hold the battery at the absorption voltage until the charge current tapers down to near zero, which is the sign that the cells have genuinely finished filling.
The reason is cell balancing. Passive balancing, which is what most mid-range BMS units use, works by bleeding a small current from the higher-voltage cells at the top of the charge cycle. This equalisation only happens when cells are near full charge. If the battery never reaches 100% in a genuine, fully absorbed charge, the BMS balancing circuit never activates properly.
What happens without regular balancing is exactly what we described in the biggest problems cluster post. Cells drift apart in capacity and voltage over months. The weakest cell hits the BMS cutoff before the others, shutting the whole system down while most cells still have charge remaining. Your usable capacity shrinks not because the cells have degraded equally but because one or two weaker cells are pulling the whole pack down earlier than necessary.
The practical schedule that works for most systems is to charge to 90% for daily use from Sunday to Saturday, and allow a complete full charge to 100% with full absorption once a week or once every two weeks. Many inverters allow you to schedule this automatically. On Victron systems you can configure an equalization or scheduled absorption event that does exactly this. On simpler inverters you may need to manually raise the charge limit once a week, hold it at absorption until current drops, then return it to your daily 90% limit.
For systems that have not had a full charge in a long time, the first proper full charge after a period of partial cycling often reveals cell imbalance that has been building quietly. If your system trips the BMS during that first full charge at a lower voltage than expected, a cell has drifted significantly and the balancing process needs time to bring it back. Do not be alarmed. Let it complete a few full charge cycles and the cells will typically realign if the BMS balancing current is adequate.
5. Ensure Correct Inverter-Battery Configuration

Everything covered in the previous sections assumes one thing: that your inverter and charge controller are correctly configured for the lithium battery you have installed. If they are not, every other practice in this post is undermined from the start. You can follow the 20 to 80 rule perfectly in your head but if your inverter is set to charge to 59V on a 48V LiFePO4 battery, the battery is being overcharged on every single cycle regardless of what you intend.
This is not a rare scenario. It is one of the most common causes of premature battery failure in Nigerian solar systems. The majority of hybrid inverters sold in Nigeria ship with default settings calibrated for lead-acid batteries. Lead-acid and LiFePO4 have fundamentally different voltage windows, different charge algorithms, and different cutoff requirements. Using lead-acid settings on a lithium battery is a form of slow, continuous abuse that the battery cannot communicate to you directly.
There are four voltage parameters that must be verified and set correctly for every LiFePO4 installation.
The first is the absorption or bulk charge voltage. This is the maximum voltage the charger will push the battery to. For a 48V LiFePO4 pack, the correct value is typically between 57.6V and 58.4V depending on your battery manufacturer’s specification. A lead-acid profile might set this at 59.2V or higher. That extra voltage, applied on every charge cycle, overcharges the cells past their safe limit and accelerates electrolyte oxidation on every single day of the battery’s life.
The second is the float voltage. Lead-acid batteries need a float charge to stay topped up because they self-discharge relatively quickly. LiFePO4 batteries have a very low self-discharge rate and do not need float charging. If float is enabled on a lithium battery, the charger holds the battery at an elevated voltage indefinitely after each charge, which is the full charge plus heat combination that drives calendar aging fastest. Float should either be disabled entirely or set no higher than 53.6V on a 48V system, which is well below the stress threshold.
The third is the low battery cutoff voltage. This is the voltage at which the inverter disconnects the load to protect the battery. For a 48V LiFePO4 pack, the correct cutoff is typically between 48V and 49V, corresponding to approximately 20% state of charge. A lead-acid cutoff might be set at 46V or lower, which allows the battery to discharge significantly deeper than it should before protection activates.
The fourth is the reconnect voltage or restart threshold. After a low battery cutoff, the inverter will reconnect loads once the battery rises back above a set voltage. This threshold should be set high enough that the battery has genuinely recovered to a safe state of charge before loads are reconnected, not just a fraction above the cutoff threshold.
Beyond these four voltage parameters, there is the question of charge current limit. Your inverter’s built-in AC charger and your MPPT charge controller both have maximum charge current settings. As discussed in Section 5, these should be set to no more than 0.5C of your battery capacity for daily operation. Leaving them at factory maximum not only increases charge rate stress but can also exceed your battery’s BMS charge current limit, which will cause the BMS to trip repeatedly.
If your inverter supports lithium battery profiles or has BMS communication capability via CAN bus or RS485, use it. A communicating BMS tells the inverter exactly what the battery needs at every moment the charge voltage limit, the charge current limit, and the discharge current limit and adjusts those values in real time as the battery’s state changes. This is a fundamentally more intelligent way of managing the battery than relying on fixed voltage thresholds programmed into the inverter.
Getting all of this right at installation is exactly what separates a battery that delivers 10 years of service from one that is visibly degraded in three. The configuration is done once and then protects the battery silently every day for the rest of its life.
For a full walkthrough of the most common configuration mistakes that damage systems over time and how to verify your settings against the correct standards, Top 10 Costly Off-Grid Solar Mistakes and How to Avoid Them documents every critical commissioning step. And if you want to verify that your inverter is correctly sized and configured for your battery bank and load profile, the Off-Grid Inverter Sizing Calculator on the Eneronix resources page generates the correct voltage window setpoints for LiFePO4, NMC, and lead-acid batteries, coordinated between the MPPT, inverter, and BMS.
6. Monitor, Track, and Catch Problems Early
Everything covered so far is about prevention. This section is about detection. Because even when you do everything right, batteries age. Cells drift. Capacity gradually declines. The question is not whether degradation will happen but whether you will catch it early enough to respond before it becomes a crisis.
Most Nigerian solar system owners have no systematic way of monitoring their battery’s health over time. They check the percentage on the inverter display, notice when the system cuts off earlier than expected, and call an installer when it becomes genuinely disruptive. By that point the battery has often been degrading for six to twelve months or more, and whatever damage has been done is irreversible.
Monitoring does not require expensive equipment. The most practical approach for most households is runtime tracking. Pick a consistent reference point say, the time it takes for the battery to go from 90% to 20% under a typical evening load. Record that number once a month. A healthy battery will show a relatively stable runtime over time. A battery that is losing capacity will show a gradual but consistent shortening of that runtime over months. If the runtime drops by 15 to 20 percent over six months, something is changing and it needs investigation.
The specific warning signs to watch for are worth stating clearly here.
The first warning sign is a system that shuts down at a noticeably higher state of charge than it used to. If the system used to run comfortably to 20% before the BMS tripped and now it trips at 35% or 40%, a cell is developing significant imbalance. The pack is still delivering energy but one weak cell is hitting its minimum voltage before the others, pulling the system down early.
The second warning sign is a percentage display that behaves erratically large sudden drops, readings that bounce up when loads switch off, or a percentage that seems too high relative to how long the system actually lasts. This points to voltage-based SOC estimation struggling to track a battery whose internal characteristics have shifted from when the inverter's lookup table was calibrated.
The third warning sign is a battery that takes noticeably longer to reach full charge than it used to, or that never quite hits 100% on a good solar day when it should comfortably be full by noon. This can indicate cells that have lost the ability to accept charge at their previous rate, either from advanced degradation or from lithium plating caused by past cold or overcharge events.
The fourth warning sign is a physical one. A battery that is warm to the touch during rest periods not just during discharge has elevated internal resistance somewhere in the pack. Any visible swelling on the battery casing is a serious warning that requires the system to be taken offline immediately. Swelling means gas is building up inside a cell and the situation is progressing toward a safety event.
If your system has a monitoring platform like Victron’s VRM portal, you have access to far more specific information than any of these surface-level observations. You can see individual cell voltage spreads over time, temperature logs, charge and discharge current history, and alarm records for BMS protection trips that happened while you were asleep. All of that data is there if you look at it regularly. Setting aside fifteen minutes once a month to review the VRM data for your system is one of the highest-value maintenance habits you can build.
For households without advanced monitoring, the resting voltage check from the previous cluster post remains the most accessible diagnostic tool. Switch off all loads, wait 30 minutes, measure the terminal voltage with a multimeter, and compare against the SOC voltage table. If the voltage says the battery should be at 60% but the system has been struggling to last half the night, the gap between what the voltage suggests and how the system actually performs is telling you something important.
The Eneronix Resources page has calculators that can help you interpret these observations in concrete terms. The LiFePO4 Battery Bank Calculator lets you model expected runtime at different states of health so you can compare your current real-world performance against what the battery should theoretically be delivering. And the Off-Grid Solar System Sizing Calculator can help you assess whether a degraded battery bank still meets your system’s needs or whether it is time to plan for expansion or replacement.
For the most comprehensive guide to diagnosing exactly what is happening when your battery starts behaving unexpectedly, Why Your Battery Dies Faster Than Expected walks through every common failure pattern with specific diagnostic steps you can follow without specialist equipment.
Frequently Asked Questions
1. What reduces lithium battery lifespan the most?
The two biggest factors are high temperature and deep depth of discharge (DoD). Operating a lithium battery above 40–45°C accelerates chemical degradation, while repeatedly discharging below 20% increases mechanical stress inside the cells. Together, these can cut lifespan by more than 50% compared to optimal conditions
2. What is the ideal depth of discharge for a lithium battery?
For maximum lifespan, lithium batteries should typically operate at a 40–60% depth of discharge on a daily basis. While most LiFePO4 batteries can handle 80–90% DoD, shallower cycling dramatically increases total cycle life often doubling it over time.
3. Is it bad to charge a lithium battery to 100% every day?
Yes, daily charging to 100% can accelerate degradation. Keeping a lithium battery at full charge increases internal stress and speeds up electrolyte breakdown. For daily use, it is better to charge to 80–90%, and only reach 100% occasionally to allow proper cell balancing.
4. What temperature is too hot for a lithium battery?
Temperatures above 45°C significantly accelerate battery aging. At these levels, internal chemical reactions speed up, reducing capacity faster over time. Most lithium batteries perform best between 15°C and 35°C, which is considered the optimal operating range.
5. How long should a lithium battery last in a solar system?
A well-managed lithium battery especially LiFePO4 can last 10 to 12 years or more in a solar system. Poor configuration, high temperatures, and deep cycling can reduce this to as little as 3 to 5 years.
6. What is the best charging current for lithium batteries?
The ideal charging rate is typically between 0.2C and 0.5C (20% to 50% of battery capacity). Charging at higher rates generates more internal heat and accelerates long-term degradation, even if the battery’s BMS allows it.
7. Do lithium batteries need to be fully charged regularly?
Yes, but not daily. Lithium batteries should reach 100% charge occasionally (once every 1–2 weeks) to allow the Battery Management System (BMS) to balance the cells. Without this, imbalance can develop and reduce usable capacity over time.
8. Does leaving a lithium battery unused damage it?
Yes. Lithium batteries experience calendar aging, meaning they degrade even when not in use. Storing a battery at high temperature or at 100% charge accelerates this process. For storage, it is best to keep the battery around 40–60% state of charge in a cool environment.
9. How can I tell if my lithium battery is degrading?
Common signs include:
- shorter runtime than usual
- system shutting down earlier than expected
- inconsistent or unstable state-of-charge readings
- longer charging times
Tracking performance over time is the most reliable way to detect gradual degradation.
10. What is the best way to extend lithium battery lifespan in solar systems?
The most effective strategy is combining multiple best practices:
- keep daily operation within 20–80% state of charge
- maintain battery temperature below 40°C
- limit charge rate to ≤0.5C
- configure inverter and charge settings correctly
- monitor system performance regularly
These practices reduce both cycle aging and calendar aging, significantly extending battery life.
Conclusion
Understanding how to increase lithium battery lifespan is not about doing one dramatic thing. It is about stacking a series of manageable practices that each reduce stress on the cells a little, and letting those small reductions compound over years into a significantly longer service life.
The hierarchy of what matters most looks like this. Depth of discharge is the biggest lever size your bank so daily cycling is naturally shallow. Operating temperature is the second most important factor ventilate the battery room so the cells stay below 40°C through the hot season. Keep the daily state of charge in the 20 to 90 range and let the inverter enforce it automatically through the right voltage settings. Allow a full charge once a week for cell balancing. Keep the charge rate within the 0.2C to 0.5C range for daily operation. And monitor the system over time so you catch degradation early, when it is still a manageable issue rather than a crisis.
Every one of these practices is something you can implement today with the hardware you already have. None of them require buying anything new. They require understanding the system well enough to configure it correctly and check it periodically.
A battery that was going to last 6 years under default settings can realistically deliver 10 to 12 years under the practices described in this post. At current battery prices in Nigeria, that difference is worth a very significant amount of money. The time you spend reading and implementing this guide is probably the highest-return investment you can make in your power system.
For the complete foundation on how lithium batteries work including the chemistry behind degradation, voltage behaviour, and real-world performance in off-grid systems, everything starts with the pillar post: Lithium Battery Basics: Lifespan, Voltage, Charging and Real-World Performance Explained
Have questions about your specific system setup or battery behaviour? Drop them in the comments below. We read every one.

I am Engr. Ubokobong Ekpenyong, a solar specialist and lithium battery systems engineer with over five years of hands-on experience designing, assembling, and commissioning off-grid solar and energy storage systems. My work focuses on lithium battery pack architecture, BMS configuration, and system reliability in off-grid and high-demand environments.